Remove app, for troubleshoot purposes
Home> WebOS >arrow up > 2x OK > DO you want to remove the app? >
Please ensure that the screen has the latest firmware version!
webOS Signage 4.0 - Versie 04.11.40
- SH7E Series: 43/49/55
- SM5KE Series: 32/43/49/55
- UH5E Series: 49/55/65/75/86/98
- UH5F Series: 75/86/98
- UH5PE Series: 86
- UM3E Series: 75/86/98
- UM3F Series: 98
- WP400 Series: WP400/WP401/WP402
webOS Signage 4.1 - Versie 03.23.70
- SM3G Series: 22
- UH5F Series: 43/49/55/65
- UH7F Series: 49/55/65
- UL3G Series: 43/50/55/65/75/86
- UM3DF Series: 43/49/55/65
- UM3DG Series: 43/49/55/65/75/86/98
- UM3F Series: 43/49/55/65/75/86/98
Dit combineert vergelijkbare modellen onder hun respectieve webOS Signage versies voor gemakkelijkere referentie.
Mandatory:
- Remote control
- Keyboard (optional)
- Internet connection wired or wireless (preferably wired)
Step-by-step plan
- Turn on the LG webOS display
- Select the language you want to use
- Select the continent where the display will be used
- Select the country where the display will be used
- Select the time zone where the display will be used
- Select OK
- On the remote control, press the Setup button
- Select EZ Settings
- Select SI Server Settings
- Change Application Launch Mode to Local
- Enable Fully Qualified Domain Name
- Enter the CMS-DS URL in: http://connect-sssp.cms-ds.com/webOS/app.ipk
- This can be done with the keyboard or with the remote control
- Select Local Application Upgrade and change the settings Remote
- Select Confirm
- Select OK
- Application type ipk
- Autoset ON ( Autoset OFF with firmware 4.0)
- Turn the display off and on
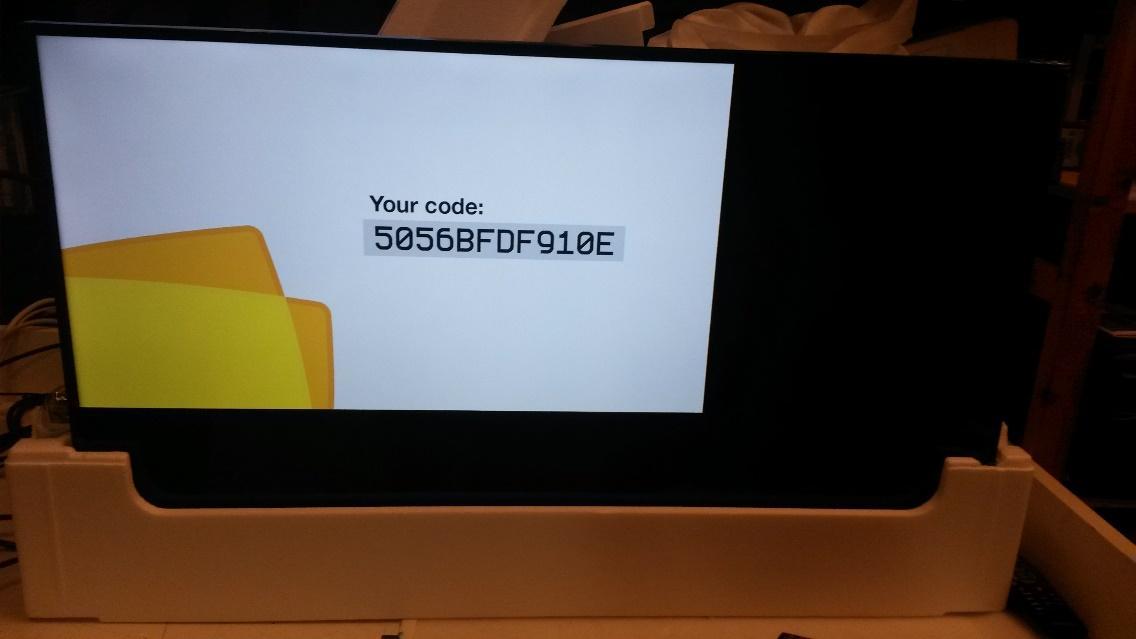
The display will start up and connect to the server. Then the six-digit playerID is displayed. With this code, the display can be linked to Easyscreen.
Operate one screen and lock other screens using Picture on:

To set the Picture ID to "ON" for all screens using the remote control, follow these steps:
-
Ensure that each screen has its unique ID assigned (typically numbered from 1 to 6).
-
Press the "Picture ID ON" button multiple times until all IDs are equal and displayed at the bottom of the screen.
-
Select the specific ID you want to operate. The other screens will be temporarily locked and inaccessible for remote control.
-
To regain control over all screens, simply press the "Picture ID OFF" button.
By following these steps, you can efficiently manage and control individual screens using Picture ID settings on your remote control.
Remove app
Home> WebOS >arrow up > 2x OK > DO you want to remove the app? > YES
When to remove the app?
Removing the app can be helpful if you have an other app already installed or if you want to reboot the app.
Check firmware
On the dashboard of the launcher, you can check the soc firmware version of the webOS Signage at a glance.
To check both the soc and micom firmware versions, click the S/W Version tile on the dashboard or click the button on the launcher and then click the General > System Information menu.
