
Support Center » xmp 7500 installatiehandleidingen
XMP-7500 Installatiehandleiding
Get your XMP-7500 media player up and running smoothly with our comprehensive installation guide.
Requirements
- One or more screens with an HDMI input to which the media player can be connected. If you want to control multiple screens with one media player (playing one program synchronously), video distribution equipment (HDMI splitters, cabling and, if necessary, extenders) is also required.
- A power outlet that is powered 24 hours a day (for overnight updates), within 1 meter of the screen or the media player’s installation location.*
- A network connection with internet access within 1 meter of the media player’s installation location. A wired network connection provides the least chance of disruptions and is preferred over a Wi-Fi connection.
- Sufficient space behind the screen to place the media player. Dimensions: 110x70x30 mm (length x width x depth)
- Optional: A USB keyboard and mouse during installation. This is required if you want to make changes to the media player’s basic settings, such as network settings, Wi-Fi or video resolution.
Contents of the installation package
- Media player
- 12V USB power adapter
- Network cable (2 m)
- HDMI cables (100 cm)
- Wireless antenna
- 2 strips of double-sided adhesive Velcro
- Wall mounting plate with mounting screws for media player
- Preparing the installation environment
Portrait orientation
If
you want to use the screen in portrait orientation (vertically),
first consult the screen’s installation manual. Some
brands are not suitable for mounting in portrait orientation. If the
supplier allows portrait orientation, you should rotate the screen to which the
media player is connected 90 degrees. In most cases, this is clockwise,
but there are some exceptions.
Consult
the supplier’s installation manual for this or first test the
orientation with a connected media player before installing the screen.
Placement of the media player
Determine where you want to install the media player. You have the following options:
- Directly behind the screen using the supplied double-sided Velcro strips.
- On the wall near the screen using the supplied wall mounting plate. The supplied HDMI cables are 35 and 100 cm long and can optionally both be used. Screws, wall plugs or a longer HDMI cable can be purchased separately. The use of HDMI cables longer than 10 meters is not recommended.
- Connect the media player directly to the HDMI input of the screen. In this case, make sure the network and power cables are properly secured so that the HDMI input cannot be damaged if the cables are pulled.
If
the player is placed more than 100 cm from the HDMI input of the screen,
a longer HDMI cable must be ordered or purchased separately. Please note that this must be a “male-female”
cable, i.e. an HDMI extension cable. A standard HDMI cable will not fit into the player.
If the distance between the power outlet and the
media player’s installation location is more than 1 meter, a
longer USB cable must be ordered or purchased separately.
Installation of the media player
- Place the media player on the back of the screen or attach it to the wall.
- Connect the network cable to the internet connection and to the network port (LAN) of the media player.
- Connect the HDMI cable to the HDMI output of the media player and an available HDMI input on the screen. NB: the HDMI output of the player is supplied with a protective cap by default, which can be removed.
- Turn on the screen and select the HDMI input to which you connected the media player, according to the screen’s manual. Usually, this is done using the remote control by pressing the ‘input’ or ‘source’ button.
- Connect the power adapter to the power outlet and to the media player (DC 12V). After approximately 30 seconds, a brief start-up screen appears:
- After the start-up screen, the content program starts.
NB:
If you have received a personal login for your digital signage account
and are installing the media player: If the player has not yet been registered,
the start-up screen will appear. Once the player has been
registered, you can see the hardware in your digital signage account and
create content from there. Instructions on how to get started
in your account can be found at:
http://support.cms-ds.com/nl/ search for ‘Getting Started’.
Troubleshooting
- Network problems: if the player does not come online in your digital signage account, there may be a network issue. In this case, check whether you can connect to the internet using another device (for example, a laptop).
- If this is not the case: contact the network administrator.
- If you are allowed to connect a laptop to the internet, but the media player does not come online, you can contact the service center at 020-7548686.
- Display problems: If the screen does not display the content correctly or the image is distorted, check the screen’s manual to make sure the aspect ratio is set to 16:9 or fullscreen. If the screen does not accept a Full HD signal, the media player can be set to a lower resolution. Please contact the Service Center for this.
Network and Wi-Fi settings:
The
XMP-7300 is supplied as standard for a wired network connection with automatic IP assignment (DHCP). If the player is connected to a
Wi-Fi network or if the wired network requires a static IP
configuration, this can be configured in the
media player’s configuration menu.
Requirements
- A USB mouse
- Optional: a USB keyboard
- Go to the configuration menu:
- Make sure the monitor is connected and visible from the media player.
- Connect the mouse and, if applicable, the keyboard to the USB ports of the media player.
- Start the media player by connecting the power adapter.
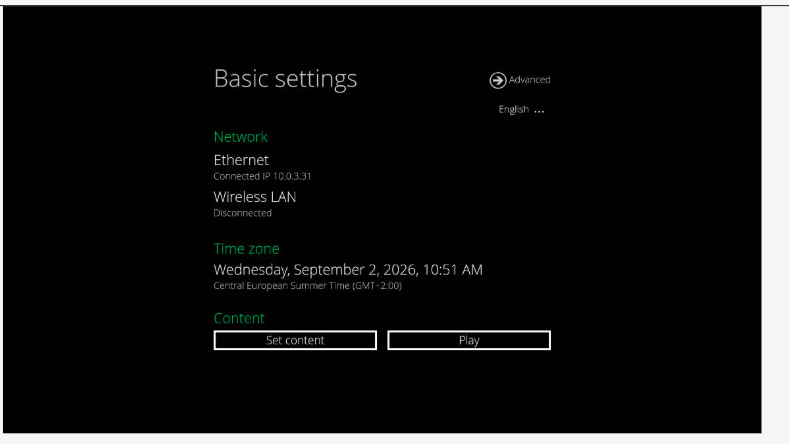
- After approximately 30 seconds, the display will show the option to enter the media player’s configuration menu. Select and click “cancel autoplay” with the mouse. Then click “advanced” to change the settings:

NB: When the player has already started, it is also
possible to enter the configuration menu by moving the cursor to a corner
of the screen and holding down the left mouse button for 15 seconds.- The network and other settings of the media player can be adjusted in the configuration menu.
- Setting up Wi-Fi. For a permanent installation, we recommend connecting the media player via a wired network. A wired connection provides the least chance of disruptions or problems with updates. If no wired network is available, but a Wi-Fi network with sufficient signal strength is available, the player can be connected to it:
- Open the configuration menu.
Go to Network>Ethernet. First disable “use ethernet” by deselecting the checkbox:

- Now enable Wi-Fi:
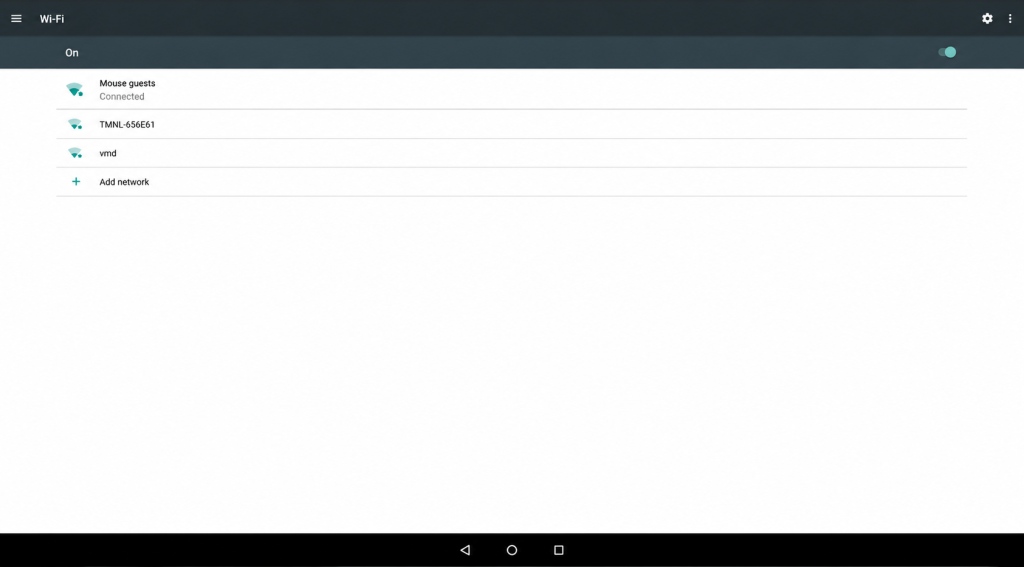
- The available Wi-Fi networks are displayed:
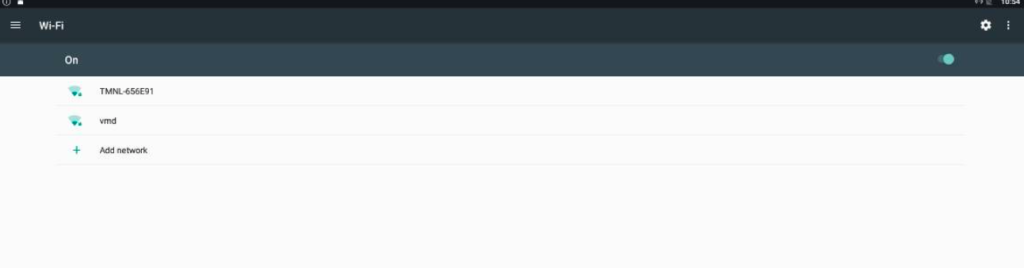
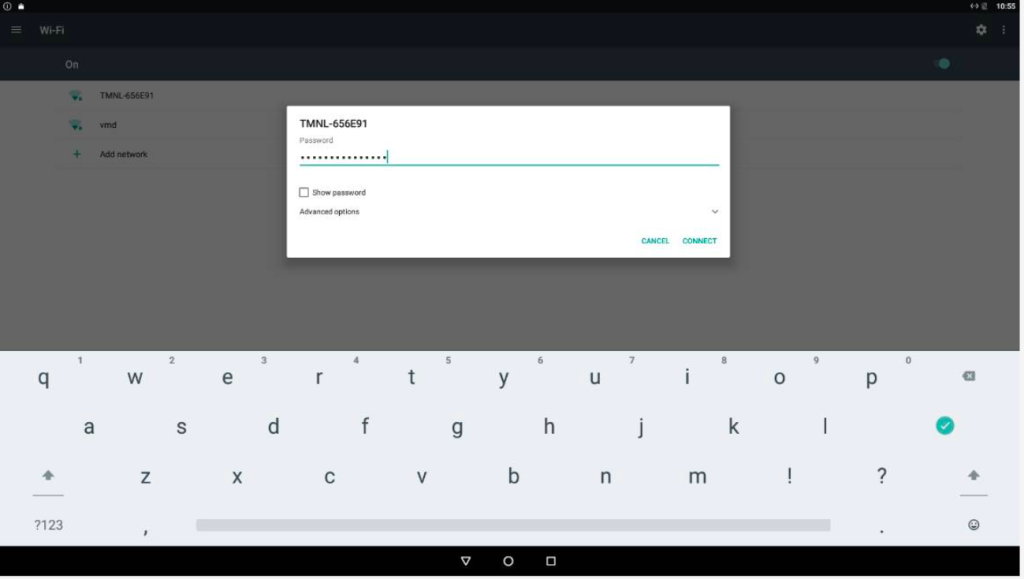
- Select the network you want to connect to. Make sure the signal strength is at least FAIR (or preferably GOOD or EXCELLENT). Enter the password using the keyboard or use the mouse to operate the on-screen keyboard. Click connect:
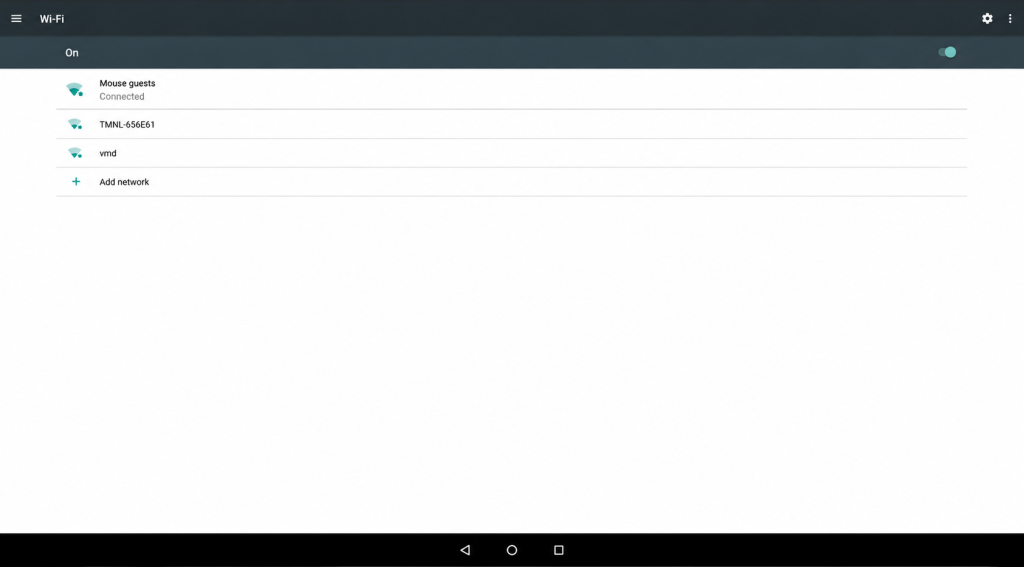
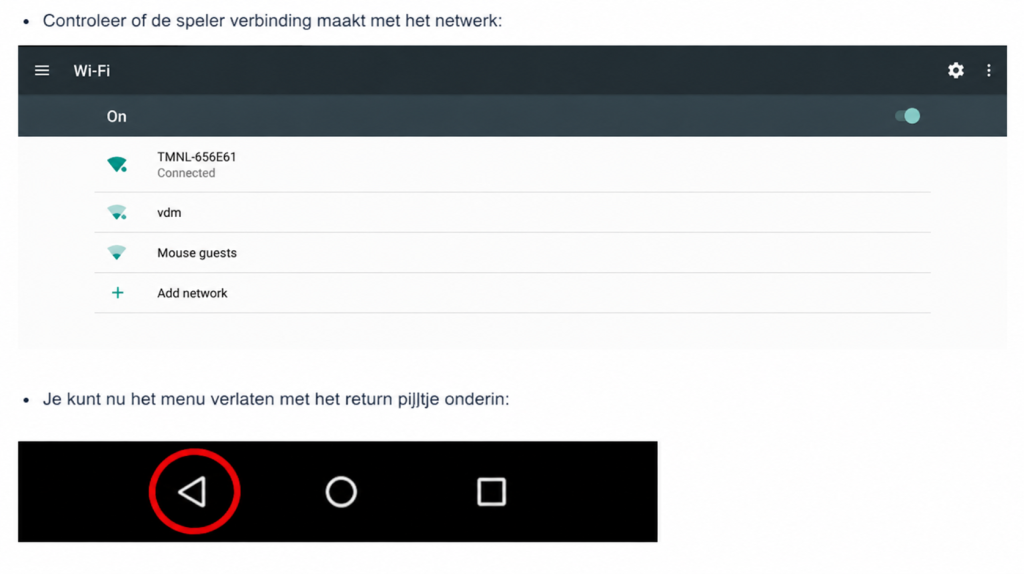
- If you entered the password correctly, “connected” will appear on the screen after a short while:
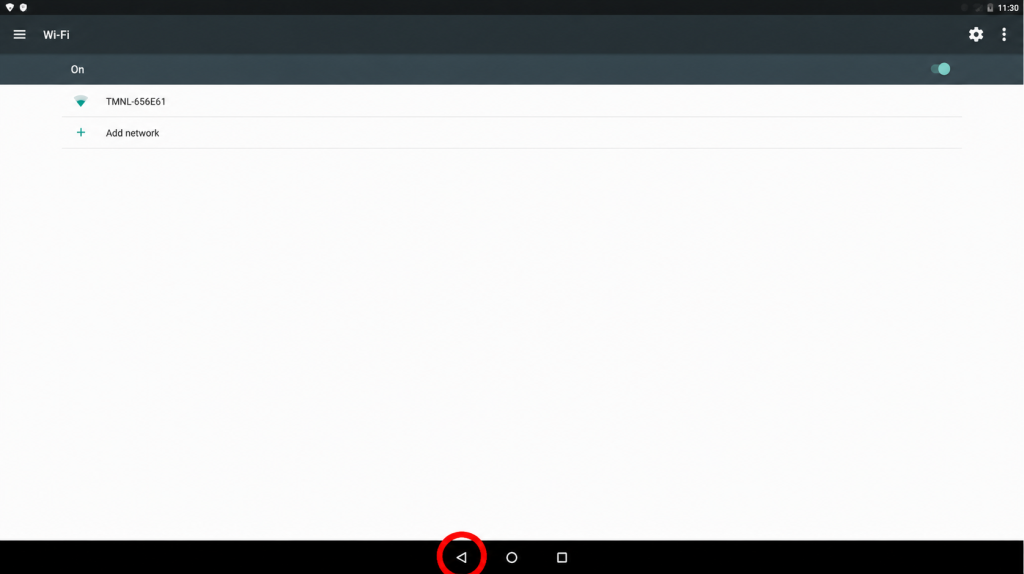
- You can now exit the menu using the return arrow at the bottom:
- The media player now returns to the main screen of the configuration menu. If you do nothing, it will resume playback after 15 seconds.
- Changing network settings (IP configuration). If the wired network at the location requires it, a static IP configuration can be set on the media player. Consult the network administrator first. The player is set to automatic configuration (DHCP) by default, which will be sufficient in most cases. Static IP settings can be entered as follows:
- Go to the player’s configuration menu.
- Check that the “use ethernet” checkbox is selected under Network>Ethernet.
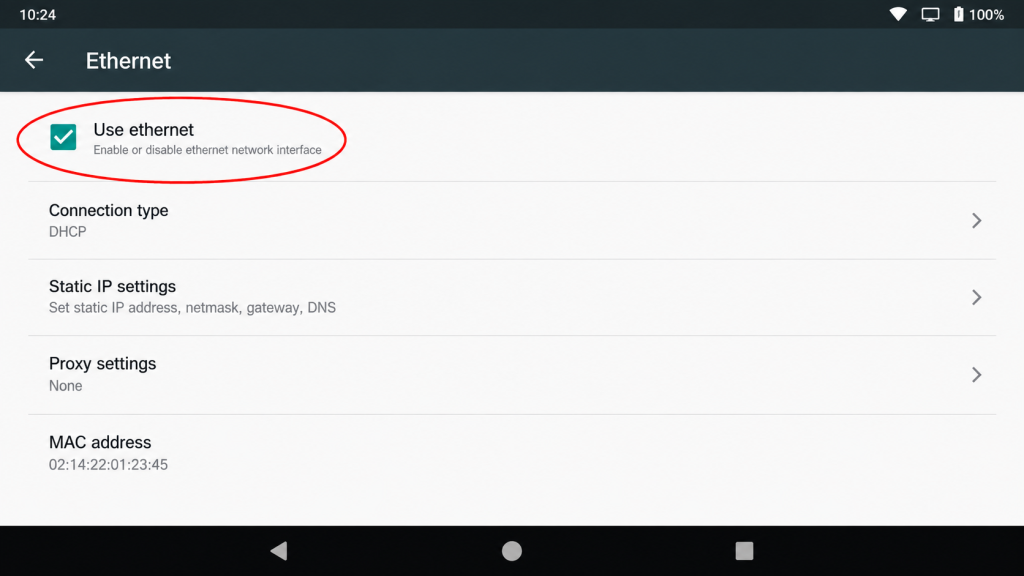
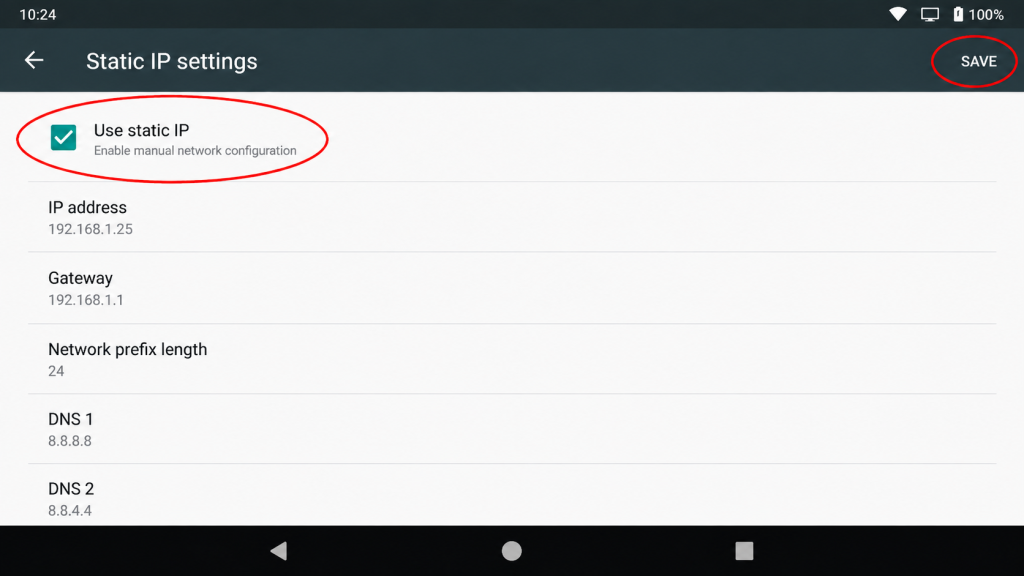
- Open Ethernet>static IP settings and select “use static IP”.
- Enter the details provided by the network administrator.
- Once everything has been entered, click “save” in the top right.
- The player returns to the main screen of the configuration menu. If you do nothing, it will resume playback after 15 seconds.
If the player does not connect using the static network settings,
first check the cabling and then consult the
network administrator.
- Changing network settings: setting up a proxy server. If the network at the location requires it, a proxy server can be configured on the media player. Consult the network administrator for this as well.
- Go to the player’s configuration menu.
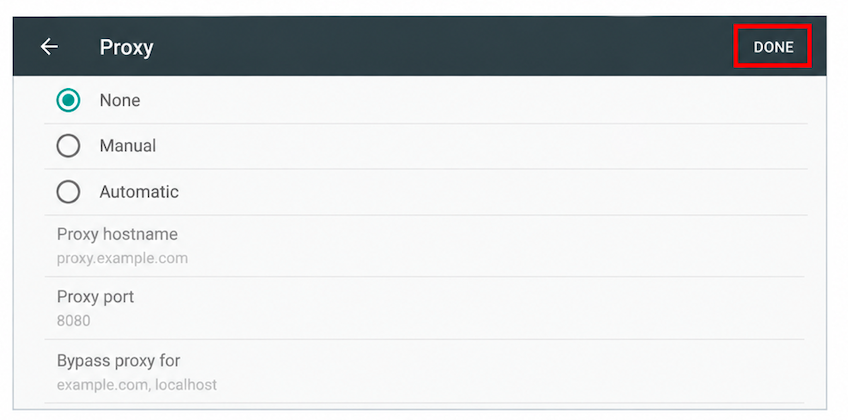
- Open Ethernet>More>Proxy.
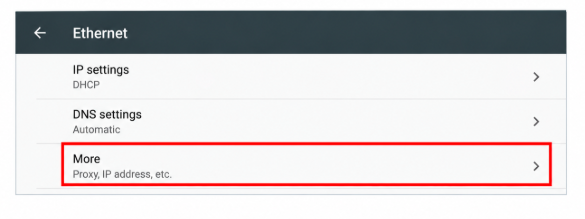
- Enter the details and confirm with “Done” (the bypass proxy for field is optional).
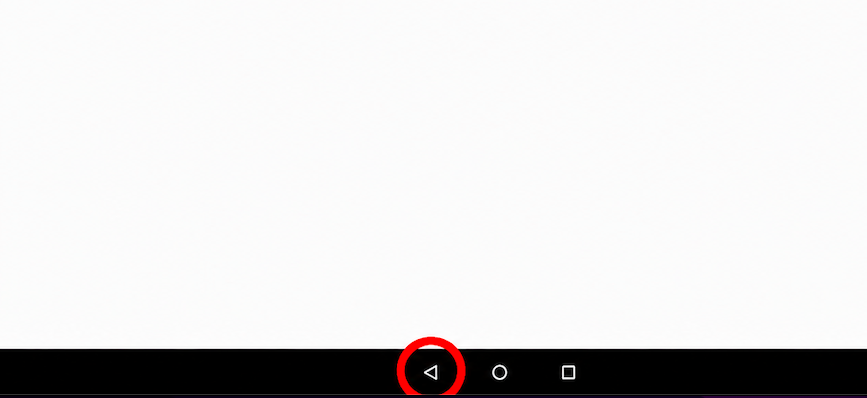
- You can now exit the menu using the return arrow at the bottom:
- The player returns to the main screen of the configuration menu. If you do nothing, it will resume playback after 15 seconds.
* If the screen has a USB port that can provide 5 volts and 2 amperes, the media player can also be powered directly from the screen. Many screens have a USB port, but it is often not intended to power an external device. Consult the screen’s manual for this. If in doubt, we recommend using the external power adapter.