Explore the possibilities of integrating Power BI with your Digital Signage screens and leveraging data-driven visualizations to enhance your displays.
This knowledge base article provides step-by-step instructions for integrating Power BI into your application. Power BI is a powerful business analytics tool that allows you to create interactive reports and dashboards. To successfully integrate Power BI, follow the steps outlined below.
Requirements
- XMP-7500 mediaplayer or higher
- Landscape
- Wired network (UTP)
- Capacity: Power BI Embedded of Microsoft Fabric
It is recommended that you use a long duration for your clip due to the fact that Power BI has a long loading time. If you leave the duration in seconds field empty, it will have an infinite duration.
Register App in Azure
To register an app in the Azure portal, follow these steps:
- Go to App registrations in the Active directory and select New Registration.
- Provide a name (e.g., PowerBi), select Single tenant, and click Register.

- Note the Application Client Id to use when integrating with the API.
- Select API Permissions and click Add a permission.


- Select Power BI Service.
- Grant access to the following permissions:
- App.Read.All
- Dashboard.Read.all
- Dataset.Read.all
- Report.Read.all
- Workspace.Read.all
Click on Grant admin consent for your org to accept the conditions.
Go to Certificates and Secrets. Create a new secret that you will use when using the API.
Note that the secret token will only be visible once after you create it.
Create Security Group
- Go to Azure Active Directory > Groups > New group.
- Select security and give it a name.
- Click Add members and add the created App.
Get Tenant ID
The Tenant ID can be found in the main menu of the Active Directory.
Configure Power BI
- Go to Power BI.
- Navigate to the workspace you want to enable access for.
- Go to Settings and select Admin portal.

- Select Tenant settings and scroll down to Developer settings.
- Enable the following options:
- Embed content in apps
- Service principals to use Fabric APIs

- Add the previously created security group.
- Go to the workspace you want to embed and enable access.
- Click on Access and add the service principal as a member or admin (viewer doesn't work).
Get Workspace ID
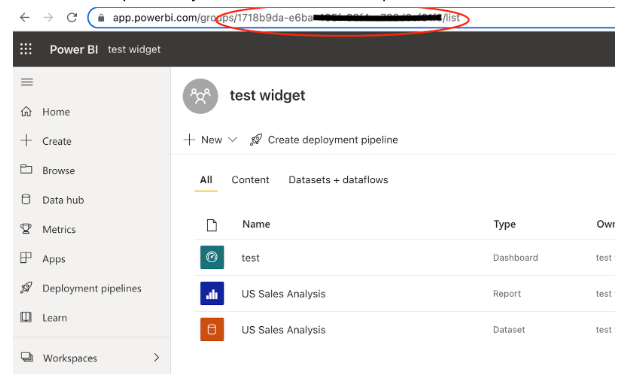
- Go to the workspace, and you can find the ID in the top URL.

Get Dashboard ID
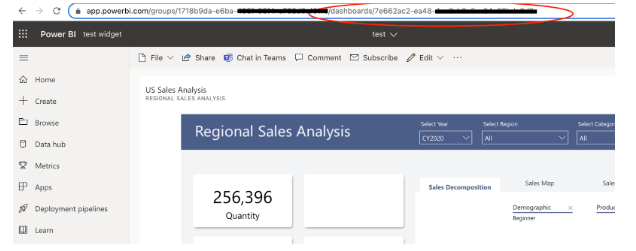
- Go to the workspace and click on the dashboard you want.
- The dashboard ID can be found in the URL.

Get Report ID
- Go to the workspace and click on the report you want.
- The report ID can be found in the URL.

Connecting of capacity:
-
Power BI Embedded: https://azure.microsoft.com/en-gb/pricing/details/power-bi-embedded/
- Microsoft Fabric: https://azure.microsoft.com/en-us/pricing/details/microsoft-fabric/
Filling in the Tokens
To fill in the Client ID, Tenant ID, and Client Secret:
- Go to the CMS and then to profile.
- On your profile page, click on Custom fields and fill in the tokens.
- The remaining tokens (Workspace ID, Report ID, or Dashboard ID) can be filled in during the clip creation.
- Select the type you want to use.
- Fill in the tokens for your dashboard or report and your workspace.
If you can't fill in these fields, please contact the support department!
Row-Level Security (RLS)
If your organization uses Row-Level Security (RLS), please take the following into account:
-
Select the checkbox in the CMS.
-
Use a tag that displays the data you are authorized to show. You can find this tag in the Power BI environment.
The name of the tag must be identical in both the CMS and the Power BI environment.
Below, you can find more information about RLS:
